If you have ever had a roof leak that your contractor could not immediately trace to a missing or damaged shingle, there is a good chance the flashing was the culprit. Roof flashing is responsible for sealing the transitions and penetrations in your roof where water is most likely to find a way in, and it is also one of the most commonly overlooked components when homeowners think about roof maintenance and repair.
Understanding what flashing is, where it is used, and why it fails is genuinely useful knowledge for any homeowner. Flashing problems are almost always less expensive to address when caught early, and recognizing the early signs of flashing failure can save you from the kind of water damage that works its way through your roof structure, into your attic, and eventually into your ceilings and walls before anyone realizes there is a problem.
This guide covers everything you need to know about roof flashing in plain language, including what it is, the different types used on a typical Alberta home, why it fails, and when it is time to call a professional.
What Is Roof Flashing?
Roof flashing is thin sheet metal, typically aluminum, galvanized steel, or copper, that is installed at the joints, transitions, and penetrations of a roof to prevent water from infiltrating the roof structure at those vulnerable points. Wherever the continuous surface of your roof is interrupted by a vertical element, a change in slope, or an opening, flashing is what bridges that gap and directs water back onto the roof surface and away from the vulnerable junction.
Shingles alone cannot seal these transitions. They are designed to shed water on a continuous sloped surface, not to wrap around chimneys, seal against walls, or bridge the point where two roof planes meet. Flashing handles all of those jobs by creating a waterproof metal barrier that overlaps with the shingles on one side and the adjacent vertical or horizontal surface on the other, channeling water away from the joint rather than allowing it to penetrate.
On a typical Alberta home, flashing is used in more locations than most homeowners realize. Every one of those locations is a potential entry point for water if the flashing is improperly installed, damaged, or has simply reached the end of its service life.
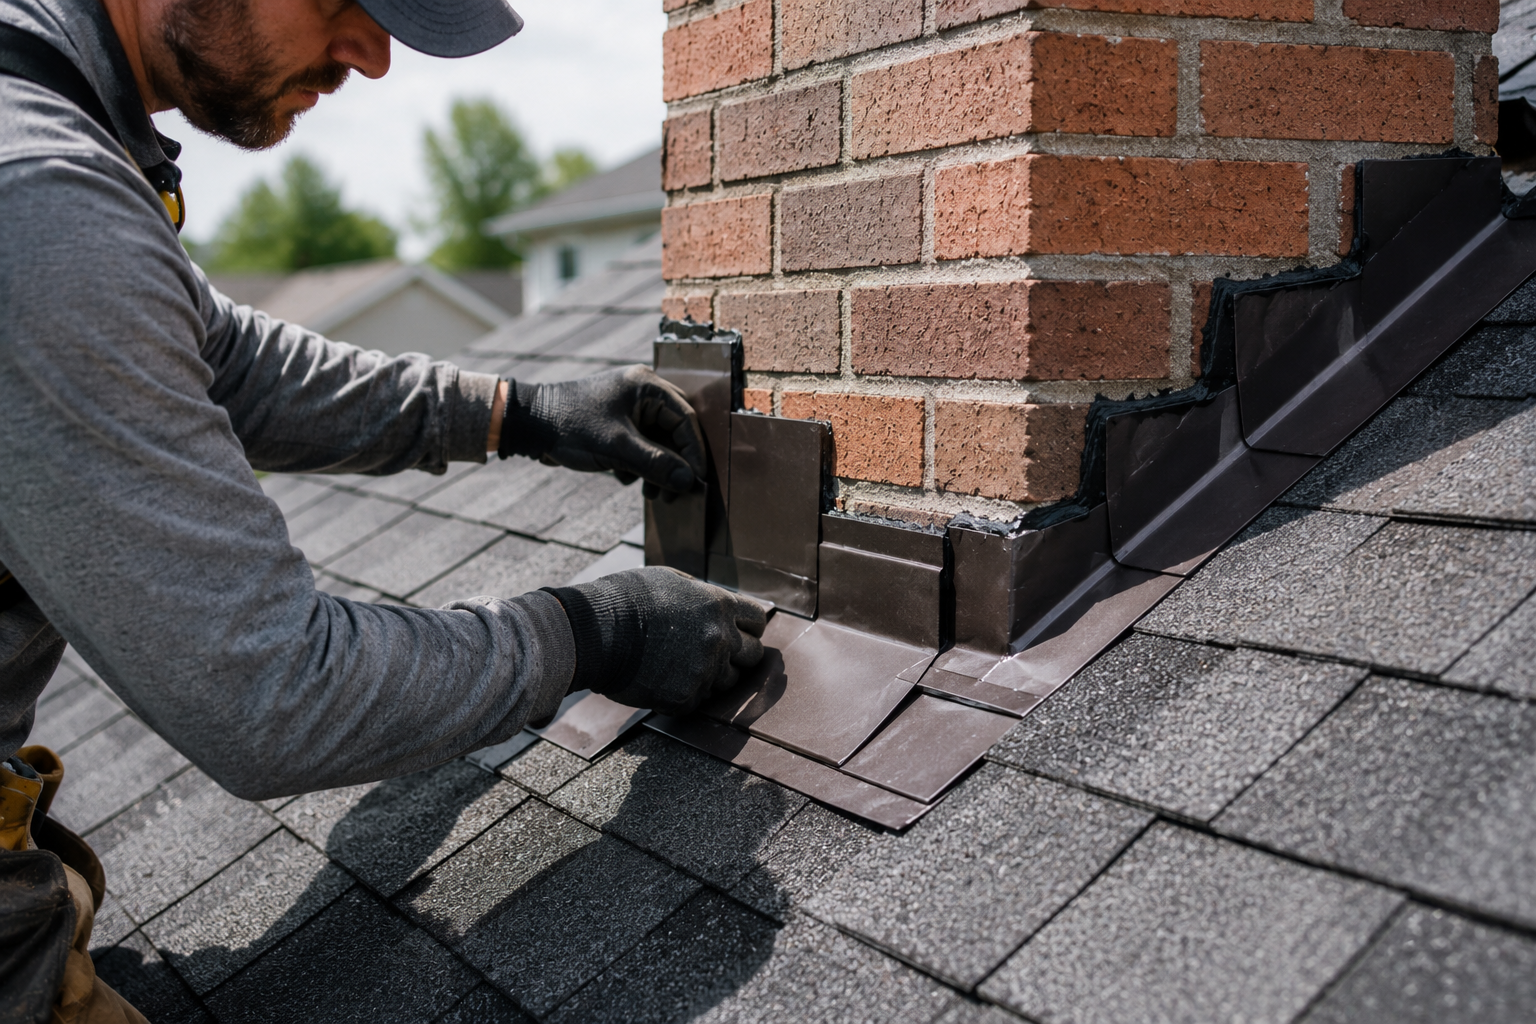
Where Is Flashing Used on Your Roof?
Chimney Flashing
Chimney flashing is among the most complex and most critical flashing installations on a residential roof. A chimney penetrates completely through the roof surface and presents four sides that all need to be properly sealed against water infiltration. Chimney flashing typically involves two layers: step flashing or base flashing that integrates with the shingles at the sides and back of the chimney, and counter flashing that is embedded into the mortar joints of the chimney itself and overlaps the step flashing below to create a two-part waterproof seal.
In Alberta’s climate, where chimneys experience significant thermal cycling and freeze-thaw stress, the mortar joints that anchor the counter flashing are a common failure point. As mortar deteriorates over time, the counter flashing can loosen and lift, breaking the seal and allowing water to run behind the flashing and directly into the roof structure. Chimney flashing failures are one of the most frequent causes of interior water damage in older Alberta homes.
Valley Flashing
Roof valleys are the V-shaped channels formed where two sloping roof planes meet and direct water from both surfaces down to the eaves. Because valleys concentrate the water flow from large areas of roof into a single channel, they carry significantly more water than any other part of the roof surface and are under constant erosive pressure during heavy rainfall and snowmelt.
Valley flashing is installed beneath the shingles in the valley to provide a continuous metal channel that handles this concentrated water flow. Open valleys, where the metal flashing is visible, and closed-cut or woven valleys, where shingles overlap the valley, are both common approaches, and each requires properly installed flashing beneath to perform reliably. Valley flashing failures typically show up as leaks in the interior ceiling directly below the valley line, often during heavy rain or rapid snowmelt.
Step Flashing Along Walls and Dormers
Wherever a roof surface meets a vertical wall, such as at the side of a dormer, along the wall of an upper storey addition, or where a shed roof abuts the main house wall, step flashing is used to seal the transition. Step flashing consists of individual L-shaped metal pieces that are installed one per shingle course, with each piece overlapping the one below it in a stair-step pattern that directs water down the wall and onto the roof surface below rather than allowing it to run behind the shingles and into the wall cavity.
Step flashing is typically combined with a continuous piece of counter flashing or wall cladding that overlaps the top of the step flashing from above, completing the two-part seal. This is one of the areas where rushed or poorly coordinated installation most commonly causes problems, as step flashing that is not properly integrated with both the shingle course below and the wall cladding above will fail to seal the transition completely.
Vent Pipe Flashing
Every home has plumbing vent stacks that penetrate through the roof surface to allow the drain system to breathe. Each of these pipes needs to be sealed where it exits the roof, which is done with a pipe boot or vent flashing collar, a cone-shaped rubber or metal fitting that slips over the pipe and lays flat against the roof surface, sealed beneath the surrounding shingles.
Rubber pipe boots are the most common type and they are highly effective when new, but the rubber collar that seals against the pipe degrades over time with UV exposure and temperature cycling. In Alberta’s climate, where temperature swings between seasons are significant, rubber pipe boots commonly crack and split after ten to fifteen years, creating a direct water entry point around the pipe. This is one of the more straightforward flashing repairs and also one of the most frequently overlooked during routine maintenance.
Skylight Flashing
Skylights require flashing on all four sides to seal the frame against the surrounding roof surface. Most skylight manufacturers provide integrated flashing kits designed for their specific products, but the quality of installation still determines whether the seal performs reliably over time. Skylight flashing failures are a common source of leaks that are often misattributed to the skylight itself rather than the flashing around it.
Drip Edge Flashing
Drip edge is a continuous piece of L-shaped metal installed along the eaves and rakes of the roof, beneath the shingles at the eaves and over the underlayment at the rakes. It directs water off the edge of the roof and away from the fascia board rather than allowing it to wick back under the shingles and over the fascia. Drip edge is a relatively simple component but its absence or improper installation is a significant contributor to fascia rot and soffit moisture issues in many Alberta homes.
Why Does Roof Flashing Fail?
Flashing failure has several common causes, and understanding them helps you recognize the early signs of a problem before it develops into significant water damage.
Age and Metal Fatigue
Metal flashing expands and contracts with temperature changes throughout its service life. In Alberta, where temperature swings between summer and winter are among the most extreme in the country, this thermal cycling is particularly aggressive. Over many years, the repeated expansion and contraction causes metal fatigue at bends and joints, which eventually leads to cracking, separation at seams, and lifting at edges. Most metal flashing has a service life of twenty to thirty years under normal conditions, though this varies significantly based on material quality, installation method, and the severity of the climate exposure.
Sealant and Caulk Deterioration
Many flashing installations use sealant or roofing caulk to fill small gaps and seal around edges. This is appropriate when used correctly as a secondary seal, but sealant has a much shorter service life than the metal flashing it is meant to complement, typically ten years or less before it begins to crack, shrink, and pull away from the surfaces it was sealing. In Alberta’s climate, sealant deteriorates faster due to UV exposure and freeze-thaw cycling. When sealant fails, the gaps it was covering become open pathways for water. Flashing installations that rely too heavily on sealant as a primary seal rather than proper metal overlap are particularly vulnerable.
Poor Original Installation
A significant proportion of flashing failures in Alberta homes can be traced back to the original installation rather than wear over time. Flashing that was not properly integrated with the shingles, counter flashing that was surface-mounted with sealant rather than embedded in mortar joints, step flashing installed without adequate overlap between pieces, and valley flashing that was too narrow for the water volume the valley carries are all installation failures that show up as leaks years after the work was done.
This is particularly relevant for homes where roofing work was done by contractors who prioritized speed over detail, or where homeowners attempted DIY repairs to flashing without fully understanding how the system works. Correctly diagnosing a flashing leak often requires an experienced eye that can distinguish between a material failure and an installation failure, as the repair approach differs between the two.
Freeze-Thaw Damage
Alberta’s freeze-thaw cycles are particularly hard on flashing. Water that infiltrates behind or under flashing during a wet period, then freezes, expands and forces the flashing away from the surfaces it was sealing. Repeated cycles of this process progressively worsen the gap and accelerate the leak. Chimney counter flashing embedded in deteriorating mortar is especially vulnerable to this mechanism, as the freezing water accelerates the mortar breakdown that is already occurring through natural weathering.
Physical Damage
High winds, hail, and falling branches can all physically damage flashing components. Hail impacts can dent and crack metal flashing at the same time they are damaging shingles, and because flashing damage is less visible from the ground than shingle damage, it is often missed during post-storm assessments. If your roof has been through a significant hail event or wind storm and you have had the shingles inspected, it is worth specifically requesting that the flashing be checked at the same time.
Signs Your Flashing May Be Failing
Flashing problems are not always immediately obvious, but the following indicators should prompt a professional inspection:
- Water stains on interior ceilings or walls, particularly near chimneys, skylights, dormers, or in rooms directly below a roof valley
- Visible rust staining on the roof surface around flashing locations, which indicates water is sitting against or behind the metal
- Flashing that is visibly lifted, bent, or separated from the surface it was sealing
- Cracks or gaps in the sealant or caulk around flashing edges
- Deteriorating mortar joints on a chimney, particularly at the courses where counter flashing is embedded
- A leaking roof that has no obvious shingle damage as the cause
- Musty odours in the attic or upper floors, which can indicate moisture infiltration that has not yet appeared as a visible ceiling stain
It is worth noting that flashing leaks can be deceptive in their location. Water that enters at a flashing failure point does not always travel straight down to the ceiling below. It can travel horizontally along roof sheathing, framing members, or vapour barriers before dripping onto a ceiling surface, which means the visible stain may be several feet away from the actual entry point. This is one of the reasons flashing diagnosis benefits from an experienced professional who knows how to trace water paths through a roof assembly.
When Should Flashing Be Replaced?
Not all flashing problems require full replacement. Small gaps in step flashing, minor sealant failures at pipe boots, and isolated lifted edges can sometimes be addressed with targeted repairs that restore the seal without replacing the entire flashing system. However, there are situations where replacement is the more appropriate and cost-effective long-term solution:
- Widespread rust, corrosion, or physical deterioration across multiple flashing locations that indicates the material has reached the end of its service life
- Chimney counter flashing that has pulled free from deteriorating mortar joints and cannot be effectively re-anchored without repointing the chimney
- Flashing that was improperly installed originally and is causing recurring leaks despite repeated repairs
- A full roof replacement project, where replacing the flashing at the same time ensures the new roof system performs as a complete, properly integrated assembly
- Valley flashing that has thinned, corroded, or cracked through its thickness from years of erosive water flow
When a roof replacement is being planned, replacing all the flashing at the same time is strongly recommended. Installing new shingles over old, deteriorating flashing means the new roof is only as watertight as the weakest component in the system, and flashing failures after a new roof installation are a frustrating and avoidable outcome.
How Kirkland Roofing and Exteriors Can Help
At Kirkland Roofing and Exteriors, flashing inspection and repair is a standard part of how we approach every roofing project. Whether we are performing a routine inspection, responding to an active leak, or completing a full roof replacement, we assess every flashing location on the roof, identify any failures or vulnerabilities, and address them as part of a complete roof system rather than treating flashing as an afterthought.
Our team serves homeowners across Parkland County, Edmonton, St. Albert, Spruce Grove, Stony Plain, Sherwood Park, and Fort Saskatchewan. If you have noticed any of the warning signs described in this guide, or if your roof has not been professionally inspected in several years, a free inspection from Kirkland Roofing and Exteriors will give you a clear picture of the condition of your flashing and the rest of your roof system.
Final Thoughts
Roof flashing is not glamorous but it is doing some of the most important work on your roof every time it rains or the snow melts. It seals the transitions and penetrations that shingles alone cannot protect, and when it fails, the water damage it allows can be extensive and expensive by the time it becomes visible inside the home.
Keeping your flashing in good condition through regular inspections, timely repairs, and replacement when it has reached the end of its service life is one of the most effective things you can do to protect your home from water damage. Do not wait for a ceiling stain to tell you the flashing has failed.
Contact Kirkland Roofing and Exteriors today for a free roof inspection and quote. Call us at (780) 554-0397 or visit kirklandroofingandexteriors.ca. We serve Parkland, Edmonton, and all surrounding communities across Alberta.